
How to Make an Effective Video Surveillance System at a Minimal Cost

Image Source: depositphotos.com
As the saying goes, every penny saved is a penny earned. In this article, we will look at how the right choice of cameras and their proper placement affect the project cost. Let's start with selecting the cameras.
What Should Your Cameras Be Like?
Should surveillance cameras have good night vision? For example, if you install cameras to monitor the inside of a 24/7 store, you don’t need day/night mode and IR illumination. But if you want to monitor a parking lot, you absolutely need day/night mode and IR illumination or additional spotlights.
Will your camera be placed outdoors or indoors? This affects the camera's weatherproof rating. The most important specifications are:
- Megapixels (resolution) – affects the amount of visible detail in the image.
- WDR (Wide Dynamic Range) – protects against very bright light.
- Lens aperture and sensor sensitivity – the lower these parameters, the better the camera.
There are many different parameters, and all additional features in cameras cost money—the fewer the bells and whistles, the cheaper the camera. However, there are key parameters that determine image quality. To calculate visibility zones, you can use a free calculator: https://www.jvsg.com/calculators/cctv-lens-calculator/.
If you want to make your surveillance system protected against almost all cyberattacks, you need to isolate all your surveillance equipment from the internet, which physically prevents certain attacks (by setting up a separate local network). The issue of physical access to various nodes of the surveillance system is also important. It’s best to always protect all equipment from unauthorized access using anti-vandal enclosures, etc.
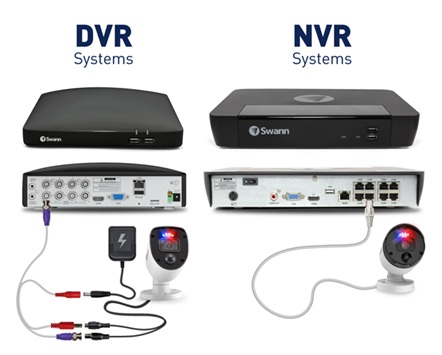
The project's cost is also affected by using a properly powered computer or DVR/NVR (supporting 4 to 256 cameras) with monitor display and remote video access. It’s important to note that the video compression formats of the cameras and NVR must match.
If you can’t run cables, there’s another solution for you—Wi-Fi cameras. Here, you’ll have to tinker with various network settings:
a) Change all default passwords on the cameras. b) Disable unused services: UPnP, Telnet, P2P, and others. c) Use HTTPS/SSL/TLS when accessing the cameras’ web interfaces. d) Disable public access. e) Create an access control list (ACL) to restrict access by IP and ports. f) Maintain a security log.
Now that we’ve covered cameras, let’s move on to system design. Designing a system is a complex process, but there are ways to simplify it. There are various tools for design purposes. The most intuitive one is IP Video System Design Tool (https://www.jvsg.com). In this tool, everything is very simple: after placing the equipment on a site plan, you can immediately see what each camera will capture in the 3D view window. There are many tutorials and videos available for it. This is the tool most surveillance designers use because it clearly demonstrates how their project will look and also calculates parameters such as pixel density, installation angle, required storage capacity for recording, network infrastructure, and cable lengths.
How to Properly Design a Surveillance System?

Image detail is determined by the number of pixels per meter—this parameter is called pixel density. It’s important to design the surveillance system so that all critical areas are covered: entrances, exits, shelves, cash registers, etc. First and foremost, it’s necessary to ensure that faces of people entering and exiting can be identified, as well as at key points like cash registers. Then, inside the premises, you can install cameras for wide-area monitoring—there’s no longer a need to identify people, but it’s important to keep them under observation.
If you’re designing for a home, it’s also important to ensure identification at entrances and exits, and then cover the surrounding property.
That’s all the recommendations for designing a surveillance system!