
Are "Recently Deleted" Photos Really Gone from Your iPhone?

Have you ever thought about what happens to deleted photos on an iPhone? Most people think that hitting the delete button wipes them out forever, but the truth is a little different. In reality, these photos are often still recoverable, which creates potential privacy risks.
In this article, we’ll explain exactly what happens when you delete photos on your iPhone. We’ll walk you through how iOS handles deleted data, when and how deleted photos might still be recovered, and, most importantly - you’ll also learn how to keep your photos safer.
Where Do Your iPhone Photos Go After You Delete Them?
When you decide to free up storage on your iPhone and delete photos, they do not disappear at once. The system moves them to a folder called "RecentlyDeleted." Here, they linger for 30 days, offering a chance to bring them back if removal wasn't the intention.
While the photos are in this folder, they stay out of the main gallery yet remain stored on the device. If your iPhone is password-locked, that folder is also secured. However, if someone gains access to the iPhone and already knows the password, they might recover your photos.
But what is “really gone” in this context? After 30 days, iOS automatically deletes these photos permanently. If you’re concerned about privacy and seeking immediate removal, clearing this folder manually is an option. Here’s how:
- Launch the Photos application on the iPhone.
- Navigate down and locate the "Recently Deleted" album. Access may require entering your Apple ID or password.
- Press "Select" in the upper right corner.
- Opt for "Delete All" to erase every photo or select certain photos for deletion.
- Tap "Delete From This iPhone" to confirm your action and remove images permanently.

Remember, when you use iCloud to synchronize photos, erasing the Recently Deleted album on an iPhone will also remove those photos from iCloud. In contrast, other photo sync services, such as Google Photos or Dropbox, operate differently. Deleting photos and clearing Recently Deleted on an iPhone does not impact the content stored there. You should access the respective cloud storage account and manually empty the trash bin.
How to Protect Your Other iPhone Photos
Keeping your iPhone photos private isn’t just about clearing the Recently Deleted album. Sure, that guarantees those files are permanently deleted (as long as there’s no backup), but what about the photos you still have on your device that you’d rather keep hidden? Good news - it’s easy to lock them down. We’ve put together a simple method to help you secure your photos. Want to know how? Keep reading for step-by-step instructions.
Step 1: Secure Your Device with a Password
A good way to protect an iPhone is to create a strong password. When carefully chosen and kept confidential, this guarantees that no one can open the iPhone or view your photos stored inside, whether a friend or a relative. When choosing a passcode, steer clear of patterns that stand out, like identical digits or significant dates that others might know. Picking something predictable leaves openings for someone to crack them with a simple grid search. Go for something more secure!
- Open the settings on the iPhone.
- Find and tap the option for Face ID and Passcode or Touch ID and Passcode, based on the device.
- Choose the option to turn the passcode on.
- Set a passcode that is simple to remember but tough for others to guess.
- Re-enter the passcode to confirm it.
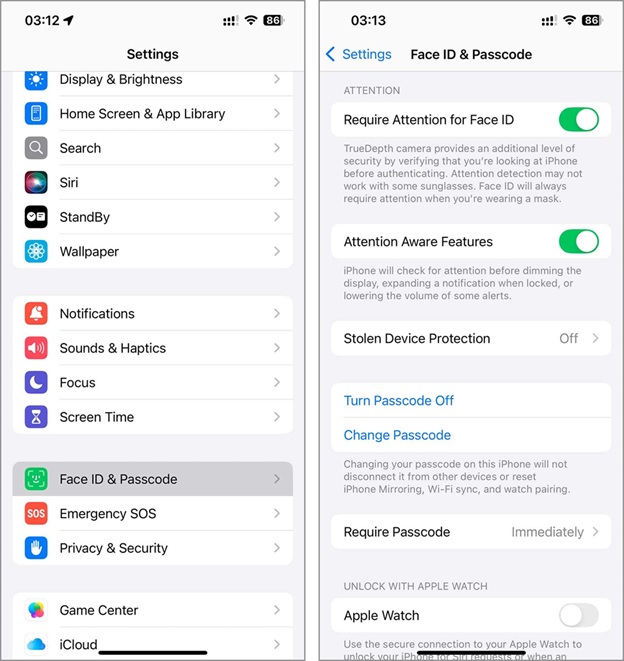
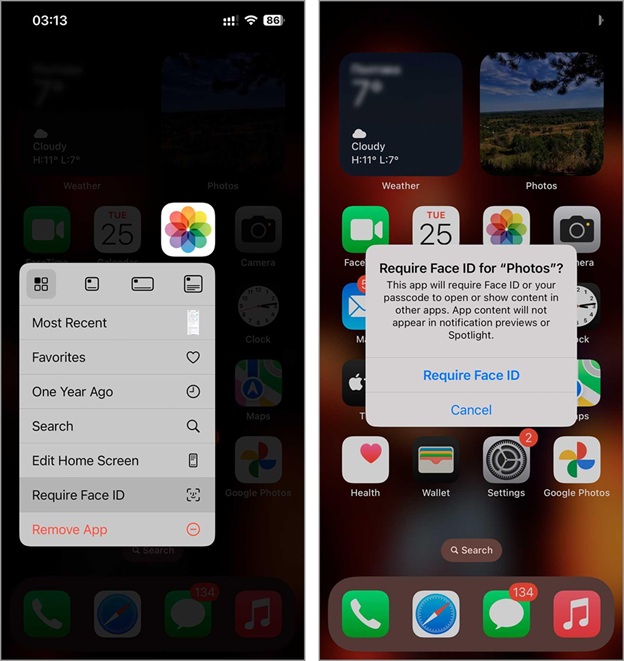
Now, you can also lock the Photos app with Face ID for extra security. To activate this feature, locate the Photos app on the home screen, press and hold its icon, and choose the "require Face ID" option. Follow the steps displayed on the screen to complete the setup. With this in place, accessing private content within the Photos app requires a separate verification, even if the main security of the iPhone has been bypassed.
Step 2: Clear Your Photo Library of Clutter
The next step is to clear out unnecessary photos from your Photos app so you can concentrate on protecting only the ones that matter most. Why does this help? Once your gallery is cleaned up, you’ll only have the photos that are truly important, making it much easier to find and hide the ones you don’t want others to see. Sure, you could delete photos one by one manually, but there’s a much easier way - use an iPhone photo storage cleaner to speed up the process.
The App Store has plenty of options, but for this guide, we’re using Clever Cleaner: AI CleanUp App. Why? Because even though its feature set is small, it’s super effective for cleaning up your photo storage without losing anything important. And the best part is that It’s completely free, no paywalls, no ads. Now, let’s walk you through how to use it, starting with its “Similars” feature, which helps you find and remove duplicate and similar images. We’ll cover its other features a little later.
- Download Clever Cleaner from the App Store onto your iPhone.
- Open the app and allow it access to your photo library. Once access is granted, the app will perform an initial scan of your photos. You will soon see groups of found duplicates and similar photos displayed.

- The app automatically selects the best photo in each group, marking the rest for potential deletion. If you prefer not to review each selection manually, tap the ‘Smart Cleanup’ button to delete all marked copies at once.
- For a more selective cleanup, tap on any grouped photos. Review the app’s selections and check the boxes for the images you wish to delete, then select ‘Move to Trash.’
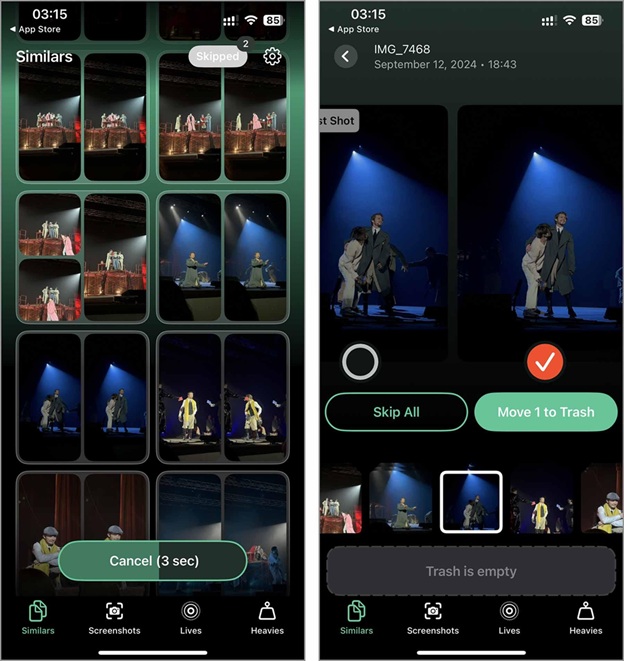
- The photos you marked will move to the app’s trash bin. You can review these photos and restore them if necessary before final deletion. Then, slide the ‘Slide to Delete’ control.
- All selected copies will be moved to the “Recently Deleted” album on your iPhone. The app will then show instructions on how to clear it, but they’re the same steps we covered earlier in the first section of this article.

What else does this app offer? Besides the “Similars” function, Clever Cleaner provides three more handy tools:
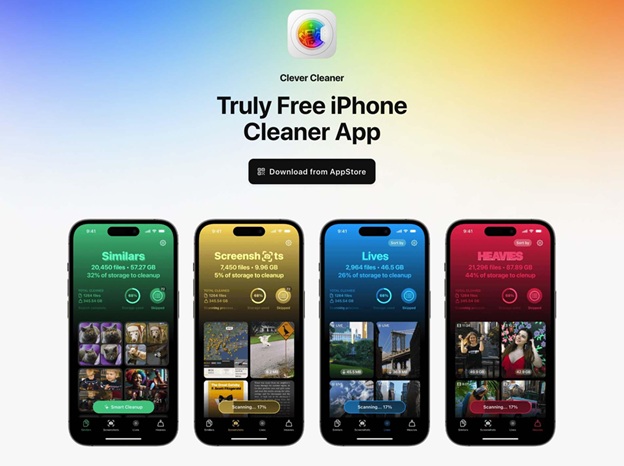
- Screenshots - mirrors the Screenshots album from your Photos app, making it easy to delete them in bulk.
- Lives - compresses photos taken in Live mode into a standard image format without sound and motion effects.
- Heavies - identifies the largest files in your Photos app (usually videos, but sometimes photos, too), enabling you to review and delete them.
We recommend using all these features one by one to clear out as many unnecessary files as possible from your Photos app. The steps for each function are pretty similar, but if you want to double-check that you’re doing everything right, you can use this guide:
Step 3: Utilize the “Hidden” Album in the Photos App
And now for the final step - the actual one, since the first two were just prep. To store specific photos away from view, place them in the Hidden album within the Photos app. This option, introduced in iOS 14, provides a simple method to protect personal images. A photo placed in this album no longer appears in the main gallery, keeping it concealed unless it is made visible again. When the iPhone is secured with a password or Apple ID, opening the "Hidden" album will also require authentication, which adds an extra layer of security.
- Open the “Photos” app on your iPhone.
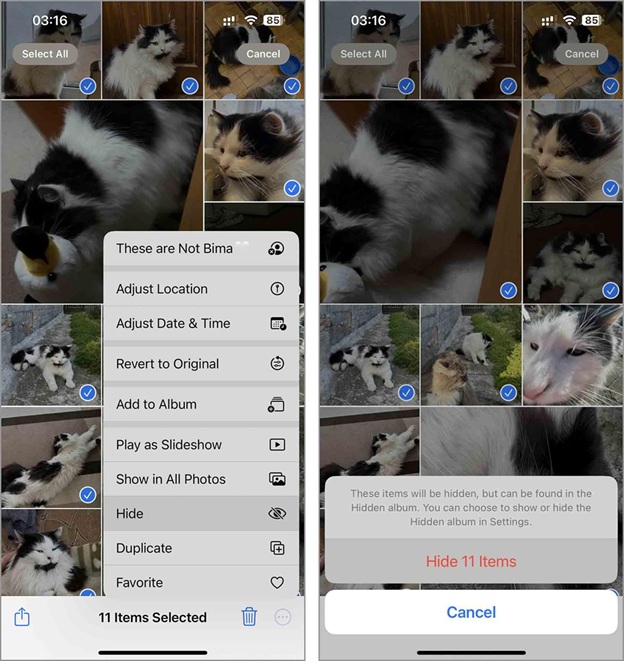
- Browse and select the photos you want to hide.
- Tap the three dots icon located at the bottom right of the screen.
- In the menu, tap “Hide.”
- Confirm your action by tapping “Hide Photos.” Next time you delete a photo, don’t forget to check this album!
Final Words
Now you know exactly what happens to recently deleted photos, how to permanently erase them, and how to keep the rest of your photos private.
For the best security, we recommend following this sequence:
- Set up a strong passcode and enable Face ID
- Clean up your Photos app by removing unnecessary files
- Empty the Recently Deleted album
- Move sensitive photos to the Hidden album and lock the Photos app with Face ID
That said, security goes beyond just software settings. Keep your phone safe, don’t hand it over to strangers, and follow basic precautions to protect your data.
If your goal is to wipe your iPhone completely with no trace of old files, and protecting photos isn’t a concern, a factory reset is the most effective solution. But since this erases everything, we only recommend it if you’re selling or giving away your iPhone.